Thursday, April 19, 2012

Kentwell: Planning

Last winter, my cast at Dickens Fair hosted four of the participants from the Reenactments at Kentwell Hall in Sudbury, England. The story of how this came to be is long, and better told by they who did it, but suffice to say there are More Of Us in Europe. :)  I applied to be one of the several participants brought over this year for the Great Tudor Reenactments, and to my delight, I was accepted!

So now I have a huge costuming challenge before me, which I was putting off hoping I'd be able to churn out an Edwardian gown. (Ohwell.)

Here's the kit I plan for this event:
  1. 2 smocks 
  2. 2 pairs of drawers
  3. 2 coifs
  4. Woolen petticoat with supportive linen bodice
  5. Woolen kirtle
  6. Woolen gown
  7. At least three, and maybe more than three aprons
  8. Possibly an extra partlet
  9. Maaaaybe a waistcoat if there's time

So far I've made the two coifs but for some small hand sewing (shortening the tabs on one, and putting the ties in another), and I've got a nice calf-length linen smock cut and sewn, but not finished.  I started in on the petticoat last night.

Amazingly, most of this is able to come from my stash. 
  • The coifs were made of an anonymous linen that I had laying around, that used to have black linen embroidered flowers sewn to it until I snipped them off. This is the same stuff I made my maid apron from for Dickens. (Somewhere in the Stash, I have a plastic baggie full of black linen embroidered flowers.) 
  • The smocks come from a giant length of gorgeous white linen that I *think* I must've gotten from FabMo.  I have about 4 yards, which is enough for two nice full smocks. There's a second length of a different make that will be drawers and aprons.
  • I have a length of black linen, and a length of green. The black will be a "fancy" apron and another partlet if needed, the green will be the rough aprons. I need to make at least one white one too, but I'm going to wait until I have the rest of my things cut first.
  • The fabric for the body of the petticoat is a lightweight rusty red woolen suiting that I got from Fabric.com, and washed until it couldn't shrink anymore.  I believe I started out with ten yards, and ended up with nine or so.  I've only ripped the skirting from it so far, but it's already a dream to work with, and it steams up beautifully.
  • The kirtle and gown will be made from the Woolrich woolens I bought last year for use in my St. George household kit, but that I never got around to.
The petticoat is the only thing I've bought for so far, and that was to buy two yards of the "flax" color linen canvas from Fabrics-Store. Ironically, "natural" colored linen is actually bleached white and they dyed an unbleachable tan, so they have to give the *actually* natural linen a different color. 

My plan for tonight is to get the petticoat bodies stitched and possibly reeded, and begin work on some of the hand sewing on the smock.  All of our visible seams are to be hand-sewn, so that also means the hem will be hand-stitched.

And as I know that I can either work and blog, or work and sew, I'm off!  A post on accessories, later!

Wednesday, April 11, 2012

Make-Do and Mend: Jeans

Before we left for Hawaii I realized that I was going to need some shorts. Unfortunately for me, a rather chilly California winter was still in progress (and it still is, really) and the last thing retailers are pushing right now is sensible shorts. The best I could find was ahem-shorts, by which I mean garments that may have once resembled short trousers, but that now more closely resemble what the British would call "pants". Knickers.  Slightly too brief for me, thanks.

Neither was the internet any help. I ordered two pair of board shorts, neither of which fit even halfway up my legs. (And this when they professed that they fit two sizes larger than I am? Please!)

The day before we left I was working on the 1940's ensemble and dropped something on the workroom floor. When I bent to pick it up, I noticed the mending pile. The mending pile has a few pairs of my old favorite jeans in it, most of which have worn out at the most annoying place ever - namely the inner thigh. These jeans had stayed in the pile (rather than just being chucked out with the rest) precisely because they'd been so comfortable.  And they'd been expensive!  A pity to waste them. I'd tried mending issues like this before by doing some reinforcing darning with my zigzag machine, but I found that the whole chunk of darning ripped out a few washes later as the fabric surrounding it was just not up to a whole lot of support. A complete patch would have to be the thing.

First things first though, acquire patch material!  Since I was making cutoff shorts (pedal pushers? capris? something like that) this part was easy: cut off the legs. Make sure they come out even.

Next, I laid out the jeans so the worn panel was completely flat and on true grain.  This is trickier than it sounds, but you can figure it out if you mess with it enough.  I then took a small piece of scrap pattern paper and creased it to the crotch depth.

Next, I pin-pricked the line, just to be sure it was good and accurate, and transferrable.

Next, I cut away the excess paper to make a better patch shape.  And here's a tip - if you're doing this process for multiple pairs of jeans - even if they're from the same manufacturer - you're going to have to make a different paper pattern for each. They're all going to differ slightly based on the cut, the year of the cut, and the fiber content of the denim material.  And it hardly takes but a minute, so why not?
Then I laid out the proto-pattern on the straight of grain on the jeans, and cut it out.  (Remember to leave seam allowance!) Oh and the other nice thing - you can get one full patch from part of a single leg. Which means that if the patch wears out and the rest of the jeans are still sound, you can just... patch them again!
 I also added an inch to the inside, so I could dodge my patch around the already-pretty-thick inner seam of the jeans.

After cutting out two of these, I pretended they were part of a pair of jeans: I sewed them together along the crotch seam...

...And then flat-felled the join.
Next, placement.  I lined up the crotch seam of the patch with the crotch seam of the jeans, and pinned it in place.
I then opened the patch up and pinned it along the crotch line and then along each inseam, making sure that the end of the patch ended up at approximately the same part of each leg. With the patch tacked down, I then tucked under the edges of the patch and pinned that down too, for easier sewing.

The hardest part was probably adjusting my sewing machine's tension to deal with the extra layers. :P  Oh and not stabbing myself when I forgot and my pins switched directions halfway around the patch.


The end result?  Nearly invisible!  And I got to mend something, avoid paying for clothes that I don't know will fit, and also pick the exact length of the jeans.

(And for what it's worth, they looked and felt just fine while I wore them, too!)

The Fail Blog

This blog is starting to sound depressingly like Fail!Blog.  But to my credit, I did call it.

I did get started on the Edwardian, but I just didn't have time. I got it a good way towards completed, then when I tried on the bodice I found... that the pleated applied shoulder stuff was off. Not just a little off, but one-crawling-up-my-neck, one-hanging-off-my-shoulder off. Fixing it meant ripping everything apart and starting over, and I literally threw myself on the bed and wept in frustration and exhaustion. Not a pleasant feeling at my age. At least now I can have a pisco sour when things look black and sad.

At work we do this thing called "Five Whys" which is basically a business process for identifying failure points and correcting them.  If I did a Five Whys on this disaster dress, it would go something like this:
  1. Spent most of my enthusiasm on the corset.
  2. Consequently started on the rest of the ensemble later than I should have.
  3. Never got a good working brassiere figured out. The camisole thing didn't work for me, and I was bound to be disappointed any time the line suffers.
  4. Went for accurate and fiddly over simple and evocative.
  5. Didn't have a clear design in mind when I started.
  6. Didn't have a clear structural pattern in mind when I started, which you simply cannot get away with when you bust is this size.
  7. Didn't take the time to pad out my old Uniquely You dress form.
 Really, in the end, #7 was the one that killed it. If the bodice shell hadn't been hanging crooked on a dress form that represents me in 2005, I think I might have been able to salvage the thing.  But there's a lot here that I need to think about.  I have so many different things I want to do, and so little time for them, and I realize now that I am not realistically scoping my projects. This has happened at least four times now.  So: No more outfits where I don't already have the underwear.

So I need to make more undergarments. :P  I need to figure out an Edwardian brassiere, a 1920's bandeau that doesn't make me look like I am smuggling a batch of hamburger, and a set of combination underwear and slips.  This is to say nothing of the 1930's stuff I'd like to do... but what DID full figured ladies wear back then?  The beautiful surviving examples are clearly delicate lingerie for... delicately boned ladies.

And all of this has to wait until after Kentwell.  More on that in a bit.

Wednesday, March 28, 2012

Of Edwardian Bras

The fact that there are no pictures of me in the 1940's playsuit should be testament to the fact that It Did Not Get Done In Time.  In fact, I finished all but the button and buttonhole on the shorts... on the five hour plane flight *home*.  Whoops.  Since the weather has been unabashedly nasty over here, I think I'll wait to take pictures.  But it is pretty cute, truth.

Instead, I moved on to attempting to make a Titanic dress.  Siiiigh.

The 1910s corset is done (as previously mentioned), but I've been waffling badly over the top garment. I simply cannot go without one at my bust measurement, both for decency and comfort's sake.  So I started in on making a bandeau from an extrapolation of a pattern taken from something in my collection.  Holy cow, NO.  It didn't look right *at all*. At my cup size, pleated bandeaus make me look deformed and lumpy, so not only are they uncomfortable and unattractive, but it gives the totally wrong line.  I think I may have actually thrown the thing across the room when I realized this.

I then spent a very long time looking at research, and extant garments, and and and.  And finally I realized - for my size, in this era, I basically need to make a fitted corset cover.

So I took my sloper block, and I traced around it, pivoting out the darts in the front strap and armsceye.  And tonight I put them together, braved the buttonholer on June (first time using it!) and then cut and fiddled the resulting vest-looking item into the correct neckline.  Right now it's done but for the (damn-near impossible to neatly roll) arm hole edges.  I ran a piece of eyelet beading all the way around it under the bust, and I cut the back a bit extra short to give a bit of lift.  I also made the straps *really* narrow (but still twice as wide as a normal bra strap) and placed them almost on the shoulder so I could, if I wanted to, do one of the wide boat-neck style necklines.  (I'm still deciding what the dress is going to be like, gah.)

I have a little over a week to drape a dress.  I get this feeling it's not going to actually get done.  ::facepalm::

Wednesday, March 14, 2012

Tropical Dreams

I have never been to Hawaii before.

And I'm leaving on a plane on Sunday, so today, after putting it off for... well, *forever* it seems, I got out the old vintage wrap top and shorts pattern that I have been meaning to make. I got this thing in college, probably in 2003. I haven't ever taken it out of it's little manilla envelope, so I wasn't even sure if all the parts were there.  The instructions are nearly crumbling along the seams with age and deterioration, like most of the mail-order pattern instructions do. (Something about the insanely cheap, breathtakingly acidic newsprint.)

This one is from some time in the 1940s, so it's cut economically. Also, it's a size 14, which means that it's a 34" bust - not something I'd be able to squeeze without surgical removal of body parts. However, since it's all based on a reasonably standard body form, I was able to make it work in short order.

I took my measurements, then found the difference between them and those of the pattern. Surprisingly, it was about 10" all the way round, so that made it easy. To be frank, I do expect to do some extracurricular fitting when I've exhausted the instructions - that's fine, normal, expected. I've also got a 10" difference between my bust and my ribcage. Not exactly typical or average for anything!  I figured out how much I'd need to enlarge each pattern piece, traced one side of the pattern onto roll paper, moved the whole thing over that much, and then traced the other side.  I then played connect the edges.

The result?  A pattern enlarged to size 20. I cut it out of black rayon crepe that I've been meaning to use for this.  It has a pattern of white and salmon-pink ginger flowers picked out with green accents, with stylized line drawings of hula girls, and some cursive thematic words like "lei" and "ginger" and "hawaiin".

If I finish it for the trip, I promise pictures!

Wednesday, February 29, 2012

1910's Button Front Corset Reproduction

I admit that I've been lax updating here because I'm still so used to bitching about my costume drama on my old LiveJournal.  So you've been scant on updates here because I've vented quickly there, and moved on.  So here's a quick post for anyone who cares, about the finished 'teens button-front corset.

A bit of background: I bought the original for this at some convention or another that is lost in the mists of memory. The seller had said something derogatory about "tube corsets" but the original fit me and laced closed, and I thought the button detailing was too interesting to pass up.  It sat in my collection for a long time, and then Laurie Tavan of Daze of Laur took it down and made a pattern draft from it.  It turns out that draft was enough that I was able to make another one!
Approximately 1910 to 1914ish. Such simplicity.

First off, the original was factory made of a single layer of plain twilled coutil. I cannot imagine why I missed this myself, but my decision to make mine of a fashion fabric interfaced to herringbone coutil was... ambitious. I regretted it while I was razoring bulk out of my seams. I *also* realized that while the original corset had been made whole and then dyed, I was going to have to make-do with materials of all sorts.  So I spent a good week hand dying, lightening, and overdyeing notions in a bucket in the bathtub until they were approximately the correct shade of salmon pink to match the pink striped stuff I picked out of my stash. ProTip: RIT dye in bright pink + sunny yellow = salmon. Not an appetizing color or one I would've ever picked, had the original not been that exact shade. They're blotchy though, which makes me sad.  Oh well.  I also couldn't find pink decorative elastic, pink garter clips, a matching binding tape, or perfectly shaped buttons for the side front closure, so I used what was at hand.  I am not thrilled, but I suppose I am... content with this.

Hand dyed lacing and elastics.
Oh, and the other thing that slowed me down considerably was the time I wasted dicking around with my HomePro grommet setter. Turns out, the HP will only set a 00 grommet perfectly one time in 20, and I know because I only got one perfect one after 20 tries on scrap fabric. Most of them had an incomplete inner crimp, but the rest of the crimped badly, or warped, or compressed into an oval, or in some way just came out wrong. This was even with the rare-as-unicorns extra dies. In a fit of frustration I bought a really nice ClipShop setter from a lady on eBay. That one sets 00 grommets beautifully, but I discovered that the lacing panel you see there is approximately one metric buttload too thick for the "automatic piercing" feature.  So the HomePro with the extra fancy dies actually came in handy: I punched holes with the size 4 HomePro punch, which was just enough to let me enlarge the hole with an awl to admit a 00 grommet that I then set using the ClipShop setter. Doing it this way left enough fabric around the grommet that it gripped, which prevents the grommet from rotating, slipping, and generally warping the surrounding fabric and eventually pulling out.

One thing that was incredibly nice was having the original (in my collection!) on hand to refer to when wondering what I was doing. (Which happened unfortunately frequently.)  One thing that was incredibly frustrating was that this corset had clearly had at least four, if not six, different industrial machines used in its construction.  Nothing I could hope to make with a single-needle machine would ever be so neat.
Seeeeexaaay.
Also, elastic is hard, and messes with your machine tension.  Unsmiley. The front gusset, the one that screams AHAHAHA LOOK AT MY JUNK, was possibly the most frustrating thing I have ever attempted to insert into a garment. All the fun of a Regency corset with bust gores, with a material that literally tries to bounce the needle back at the sewing machine. And by the time I'd fiddled it into place, the bottom edge had warped.  Siiiigh.

And just in case there weren't enough visual cues pointing to the crotch...
Also also, I am never allowed to make a corset out of striped material like this again.  Witness my OCD stripe matching in the chevron front and the slightly-more-tilted-than-the-original accessory panels. I expect these were inserted to make it look more supportive up there. Or possibly by some time-traveling sadist who realized I would be COMPELLED to pattern match my stripes.

I also matched my stripes across the button loops. Oh yeah, I am crazy. But those are so pretty...

Probably the most crazymaking part of this.
The button loops were an interesting experience, and are probably going to be the first point of failure on this corset, which makes me sad. Turns out, there's no good way to sew that inner edge without the clever tucking machine that I don't have. Cording all of those with rattail cord was irritating, but nothing compared to the frustration of trying to feed those miniscule edges through the machine. In the end, I sat on the couch watching Downton Abbey and hand-sewed them.  I forgot of course that the fashion fabric is a satin woven polyester, which means that the friction of the button loops against the button shanks (hand dyed polyester ribbon) is already pulling threads out of the satin floats. Ohwell.

The best irony here is that I did this button-front type (instead of converting it to a more traditional busk style) because I thought it would be less work.  Well, I was clearly wrong. Even if I figured out a better way to make and place all of those button loops, the buttons themselves were a crazymaking job to line up, straighten, and then knot and baste in so I could actually then sew their protective panel down over them. I really want to know how this was originally done, because I was just making shit up here.  I don't want to know badly enough to take apart the original, however.

So there we have it!  And maybe, when I've actually put together the combinations I cut out on Saturday, there will be pictures of me *wearing* it.  It's not the prettiest thing, but it'll certainly do the trick.

Monday, December 19, 2011

On the Varying Degrees of Accuracy

I have this argument with other folks about the degrees of "accuracy" and "authenticity" in historic clothing reproductions.  It happens quite frequently, so I want to capture my way of thinking of it.
There is a broad continuum of how period or how authentic a repro is, and you could go on and on down the rabbit hole in the argument, to the point where you'd be trying to make a garment that was molecularly identical to the original garment at the time it was constructed.  You can roughly group the aspects of this continuum into four or five degrees. 


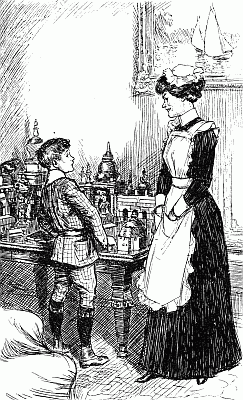
First, you can make something that invokes the cultural idea of a costume.  This is where the dreaded bag costumes of places like the Halloween Superstore and Leg Avenue live, and this is how the whole idea of a French Maid went from this:
Courtesy of Project Gutenberg


To this:
Seriously, you don't wanna see the site this came from.

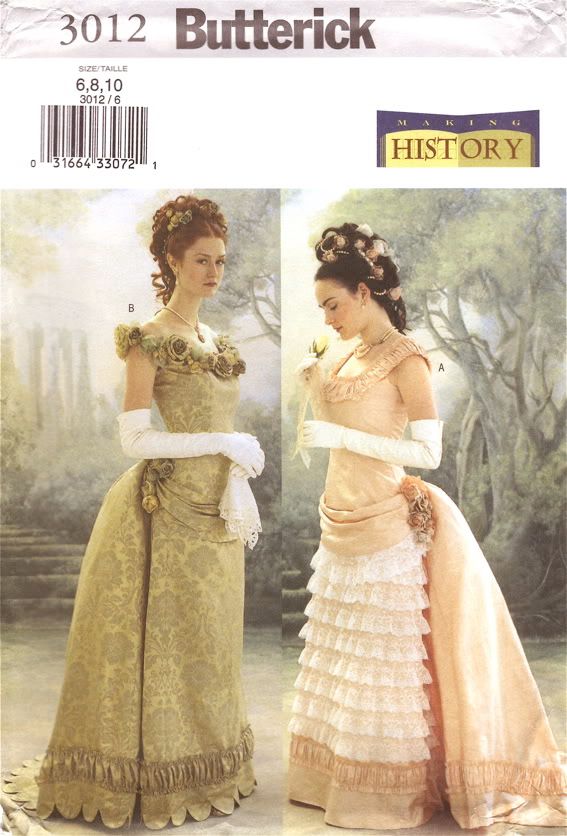
At the second degree, you can make something that's shaped vaguely correctly, but that might actually use modern cuts, textiles, and techniques to get the job done. People who are not engaged in historic pursuits usually chill here, because there's no reason to go further.  Witness The Infamous Butterick Bustle:
From Butterick, but I believe it's out of print.
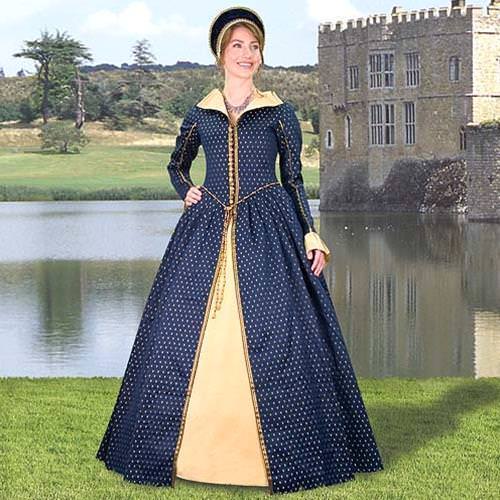
Third degree is using similar materials, or materials that can be passed off as period (no polyester Renaissance costumes, for example). That gets you a lot further, from this:
"Queen of Scots" dress by Museum Replicas

 To something more like this:
A fabulous gown from Festive Attyre.
 Fourth, you get into using only authentic patterns and techniques from the period in question. This also means sorting out which embellishments belong in which eras - like giant leg o mutton sleeves being period for 1980s, 1890s (EDIT: wow that was an embarrassing typo), 1830s, and (arguably) 1660s. This means not putting pleated lace fabric on a Renaissance gown, and not putting tiered circle skirts in your 1940s outfits.
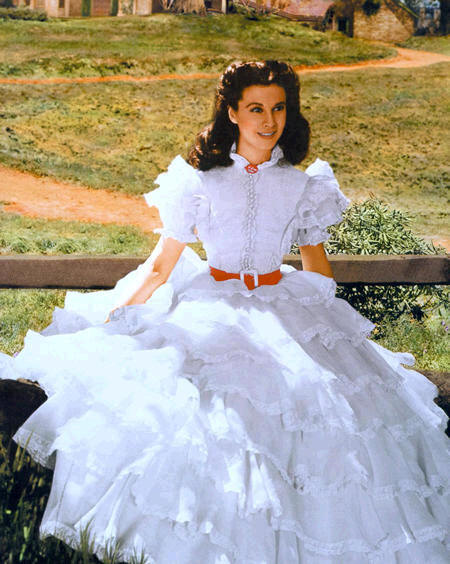
I also fudge this stage to include patterns redrawn from period sources, though the veracity of these reproductions varies.  However, consider that in some patterns the popular and fashionable shape at the time of the redrawing influences the garment shape, just as much as if not more so than the use of modern construction techniques.  Witness the lovely 1940's line on our dearest Scarlett O'Hara
And the hilariously dropped-waist of this 1920's take on an 18th century costume:


Most people hang out in the early stages of the third degree, though you could also argue that the third and fourth are parallel and can be taken separately - only together lending a real period look.  However, it's in the third and fourth that things can also go a bit crazy.

Hear me out: if they used cotton fabric, how do we know that the cotton varieties are the same now as then?  Is the fiber the same length? How does the difference in hand or mechanical processing affect the output? What about local changes in soil quality or global changes in climate? What types of dyes did they use then? How were these dyes extracted? Does local dye production differ from imported dyes? If the pattern of the textile was printed, was it done by carved block, etched plate, or roller, and how does this differ from the modern printing processes used today?  And then how are the fabrics finished? Is the finish on an 18th century chintz cotton really anything like the glop on modern drapery chintz? How does this change how the fabric drapes, wears, looks, and feels against the skin?

This ends up being a "you can never step in the same river twice" argument.

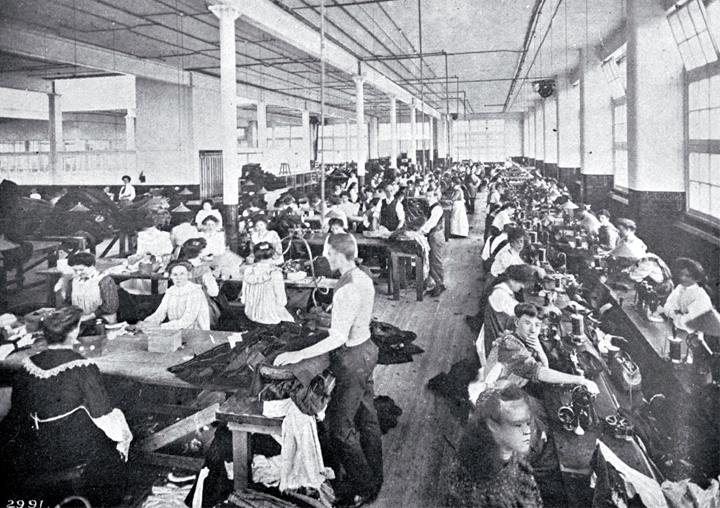
And *then* you have the modes of production argument - the techniques of hand sewing vary with things like the size and construction of the needle, the twist and material of the thread, and the availability of both. Similarly, if you're sewing something on a home sewing machine from 1950, the techniques you're going to use vary wildly from those of ladies working in factories in 1870, and as a thorough archaeologist it behooves you to at least touch on how those things affect production. What do you do when your machine doesn't have a reverse stitch?  What about when there's no buttonholer?  No zigzag?  And conversely, how does it affect production when you have another lady two rows of machines back from you who spends all day quickly box pleating trim onto the hems of garments you're working on?  At least with these material culture questions you could *possibly* reproduce some factory setting, though you could also go down the path of asking how the worker's wages, food source, and education (or complete lack of all three things) affected the steadiness and quality of the work.  Because how do you think the garment produced here:
Via the Tenement Museum
varies from the ones produced here?
Via Christchurch City Libraries
 Or here?
Via the Smithsonian Museum of American History

 Or while we're at it, here?
Via the Santiago Service Learning blog


 Ironically, this post began as me trying to explain why I also enjoy taking apart vintage sewing machines (more on that in another post, later), and blossomed into the manifesto you now see.  In general, I strive for the best I can, but as my late friend Kayta used to say, I'm not about to raise my own sheep to make sure my wool looks right.  Furthermore, different costumed occasions call for different degrees of accuracy.  Out drinking on Halloween? Most people go with the first degree.  Producing a play or an opera that will be seen, at best, from 30 feet away? Second degree works great.  But if you're doing up close and personal costumed reenactment, in a venue where your goal is to teach as accurately as you can, you should probably invest a bit more time and research into the latter two degrees - to a point.